'Little Treasures' Stick Box
Hi Crafters,
I am happy to be sharing my first design team make for Bloom Art Stamps. I thought for my first project that i would make something a little different. Mini storage/gift box made with craft/lollipop sticks. This is a quick project, perfect for holding small items and makes a great alternative to a plain gift box.
 I used in total 34 sticks. 9 for the lid and 25 for the base. You can use less or more depending on the size you want.
I am happy to be sharing my first design team make for Bloom Art Stamps. I thought for my first project that i would make something a little different. Mini storage/gift box made with craft/lollipop sticks. This is a quick project, perfect for holding small items and makes a great alternative to a plain gift box.

 |
Materials Used:
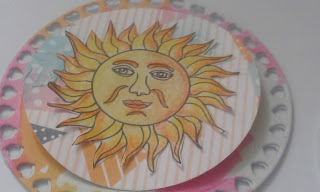
Bloom Art stamp set - 'Gerbera BL022); Craft sticks (I used 34 sticks in total, 9 for the lid & 25 for the base); Luscious Lemon acrylic paint; Matt clear sealer; sponge; paint brushes; copier paper; white card, yellow dotted ribbon; decoupage glue; watercolour pencils; stamping ink (purple, orange, yellow & pink); yellow lace trim; distress ink (yellow); tacky glue.How it was made:
1. Neatly line 7 craft sticks side by side, secure with 2 sticks glued onto either side in the opposite direction (leave a couple centimetres margin at the tips). This will make the lid.
2. Repeat the same process for the base and build up the sticks. Using 2 sticks at a time, lay the 1st row by glueing the sticks opposite to the ones below. Repeat this process 11 times (or as deep as you want your box to be). I only put dots of tacky glue on the corners. (I wouldn't suggest using hot glue as this will show and does not allow for 'wriggle' room as with wet glue). Ensure all sticks are as straight as possible and leave to dry.
3. Once fully dry use a sponge to paint the lid and base, ( i also used a small paint brush to get in between the sticks). I applied 2-3 coats. Set aside to dry.
4. To stamp the image i used my small ink pads to add ink to the flowers, being careful not to overlap (hence the small ink pads) I used purple, orange, yellow and pink. Stamp onto regular copier paper and colour the image. I used watercolour pencils dry. Cut around the image but still leave the basic rectangular shape (as this stamp has a border). Or you can keep the border if you wish.
5. Using decoupage glue and a paint brush, stick the image onto the lid. use the brush to get out any bubbles/creases. For the base cut a piece of patterned paper to fit, you should be able to slide the paper in-between the bottom 2 sticks.
6. Once dry, coat the lid and base with a thin layer of clear sealant with a paint brush (i used a matt sealer). If you don't mind the wait, then you could use varnish (but make sure it is done in a very ventilated room or preferably outside).
7. When completely dry, Cut 4 pieces of lace trim. (I used a 1 inch lemon trim). Using tacky glue put a thin line of glue around the edges of the image and adhere the trim. Add extra glue where the trim overlaps. If you wish you could add extra embellishments such as flowers, brads etc.
8. For the tag cut a basic tag shape and using a blending brush i coloured with yellow distress ink. I then covered the other side with the same patterned paper that i used for the base. Using the sentiment from the set, stamp diagonally using a darker yellow ink. Add some twine /ribbon.
Now all you have to do is add some little treasures.
Depending on the size of the sticks and how many you use, you can alter the size of the box to make it smaller, bigger, or deeper.
I hope you have enjoyed this tutorial and thanks for visiting my blog. Comments always welcome!


Challenges entered:

Comments
Post a Comment